
Painted pumpkins are becoming very popular, and although they are a great project for those who are to young to carve, they aren’t just for kids anymore 😉 I have seen some absolutely stunning examples of painted pumpkins, that would be a beautiful addition to any home. You can do something very simple or extremely complex, it’s totally up to you. These painted pumpkin ideas are not only easy, but they will also allow you to use your creativity and put together something unique & inexpensive for your fall display.
Before you paint your pumpkin, be sure that it is clean & dry.
Deciding what to use to “color” your pumpkin is rather easy. Simply ask yourself… what do I already have around the house? You can use just about anything, as long as the color will stick 🙂
Here are some ideas
Choose colors that you love, and that will match your home decor. I happen to love the colors of fall, but some people wouldn’t put red or orange their homes at any cost 😉
Here are some color combinations to spark your imagination.
When thinking about what types of designs to use, don’t stop at what would be considered “normal” fall decorating. Use your creativity to come up with all sorts of ideas!
Designs for Painting Pumpkins
Here are a few ideas that you might want to try.
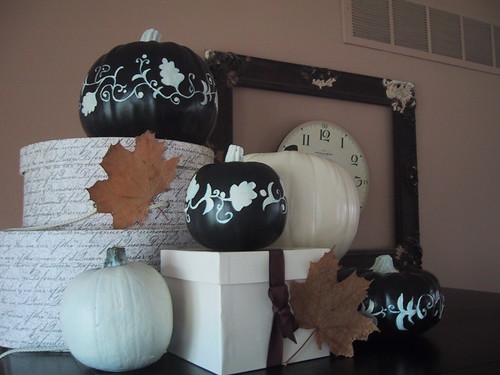
Paint the whole pumpkin one solid color
I once saw a display that someone created, where they used several pumpkins all painted in shiny deep jewel tones. Then they were arranged into a Cinderella theme display! It was surprisingly beautiful!
Pumpkin Stencils
Decide what type of designs you would like to have on your pumpkin, then cut that shape out of paper. Tape the piece of paper onto the pumpkin, then paint over it. When you remove the stencil, you will see the stencil shape in either the color of the pumpkin itself, or the base color that you decided to use.
Stamp Designs
Why not use your stamps to put designs on your pumpkins? That way, it’s quick – easy – and you can get as intricate as you’d like… without having to have much design talent 😉
Here’s a very pretty example of how you can use stamps to decorate your pumpkins.
Painted Pumpkin Designs
Tape a paper cut out of any shape that you would like onto the pumpkin, and trace around it with a fine tip marker. Then, fill in the shape with your desired color. The sky is the limit when choosing your design, but here are a few ideas to get you started:
leaves, acorns, dots, stars, pumpkin faces, saltbox houses, barn, etc.
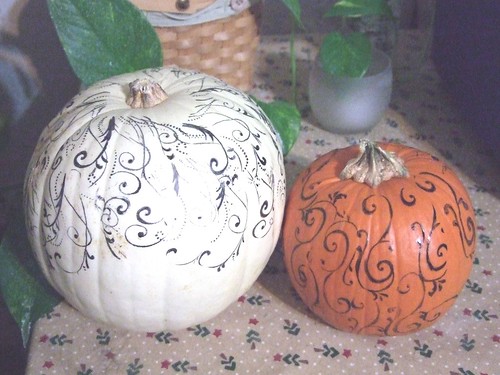
You could also paint the design free handed if you’d rather as in this example.
Aren’t these sweet! Such a creative idea! And you thought argyle patterns were just for socks 🙂
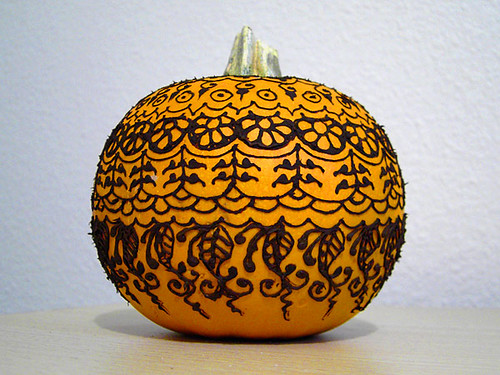
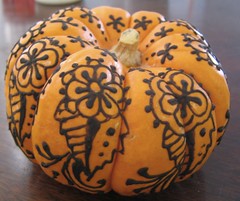
Look how beautiful these pumpkins are! Although they are dressed in henna, it almost looks like toile!
If you didn’t want to actually paint your pumpkins, you could simply add stickers, or bits from your scrapbooking supplies. Look at this sweet example!
Love your painted pumpkins:)
kayellen
Kayellen,
Thanks for stopping by! Aren’t these pumpkins wonderful! We’ve got some really talented gals out there!
Pearl
Awesome article!
I love, love, love these ideas and will be linking this on my next blog post!
Isn’t it exciting to see what beauty unfolds when we engage our imagination!
Thanks Kathleen!
I appreciate you sharing the post with your readers… and I hope they enjoy it as well!
Pearl
These are stunning!
I put a link (on my Blog with a pic from here to entice to the wonderful things here on your Blog!) to here on this article and to view the wonderful pictures on your BLOG!
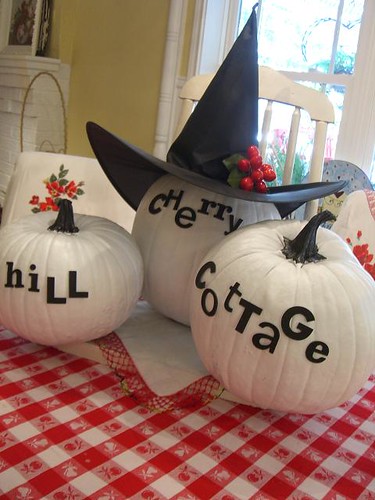
LOVE THEM, LOVE the checked pumpkins the most!
Mary Ruth,
Thanks so much for taking the time to chat! I hope your readers will benefit from the article as well.
Thank you for your kind words… now I’m off to take a peek at your blog 😉
Pearl
tanks for the pumpkin pics, now I am inspired to have a pumpkin on my desk that will match my sweater on the halloween LOL. I love your sence of timing and what you did in your guest room. Thanks for sharing!
I’d love to see a picture of that! 🙂
Pearl
Absolutely amazing pumpkins!!!!~
Makes me want to go out and find pumpkins to paint/decorate. Great ideas!
All of these pumpkins are beautiful – thanks so much for the tutorial. Have a wonderful rest of the week.
Thanks! u 2 🙂
Pearl
Your blog title caught my eye and I am so happy I stopped by. Soooo many ideas. especially the guest bedroom idea. My last child will leave soon and this has given me some great ideas for that room! You are very talented, thanks for sharing.
Melody ~ Thanks for stopping by! My blog title is dear to my heart… I guess you could say… I’m a dreamer… and thanks to God, I am living the life of my dreams! 🙂
Pearl
Wonderful article. Thanks so much for some fun ideas.
Hugs,
Michelle
These are lovely- thank you for sharing!
Oh my, you have taken the humble pumpkin and put it into whole other creative world, thanks for all the ideas and inspiration.
Such creative ideas with pumpkins !! Great article !
Eunice
The pumpkins are incredible! What great designs. So much more original than the ole snaggle tooth face. Cleaner too.
I just found your blog from another (can’t remember which one tho) and I love it. Your Tiffany blue craft room is to die for. Thanks for your great ideas. Nerm
Hi Pearl
I love all your pumpkin ideas. I seldom do anything to decorate for Halloween, but all your ideas have challenged me to maybe do something this year. Thanks for all the wonderful ideas!
Rhondi
I love them all! Ours are so mundane each year with the triangle face cut-outs! Thanks for posting so many great ideas!
Love these! I did a few polka-dot pumpkins a couple of weeks ago with spray paint. Thanks for all of the great ideas!
I just found your blog and it’s so darling! I love your pumpkin ideas. I haven’t seen anything like them before. So inspiring!
Jenni B
Thanks for these lovely ideas. I waited too long to carve it for Halloween.
Now I can paint it for the rest of the holidays.
Here’s a note from Jessica that I wanted to share with you:
Dear Pearl,
I wanted to let you know that I was hosting a wine tasting event as a fund raiser. I brought my friend Kim on board to help with the deocrations. She was so inspired by your decorated pumpkins that we used those for most of our decor and centerpieces. In a previous post I linked your blog to mine. I did not in this one, but wanted you to see what you inspired!
Love the harlequin pumpkins! How did you get the pattern? We’ve tried a couple of different things and it doesn’t look quite right.
the argyle ones are really cool!
Those are so terrific I would have never thought to do that.
i like painted spray painted pumpkins and i did it this year but mine is all marblized whren i used the black acrylic paint was i suppose to let it dry before using the acrylic paint other wise the pumpkins look good it was something i played around with this year and seen it worked out so nice all my neighbors are jelous woot! for me i love decorating so this year it was cool .. and another thing if any one knows how long do these kind of pumpkins lat with spray paint on them please let me know thanks!
I like the valuable info you supply in your articles. I’ll bookmark your blog and take a look at again right here frequently!