How to Give Your Room a Designer Touch Using Old Chandelier Crystals!

A few years ago I was given an old (but not vintage) brass colored chandelier. The gal who gave it to me said she simply hated the piece & couldn’t wait to replace it with a more modern style of light fixture. Of course, when she offered it to me, I gladly said yes, because I knew that I could think of someway to use it.

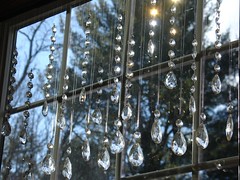
Fast forward a few years after the chandelier has been waiting in my basement for just the right project… A few days before Christmas, I came up with the idea of removing the crystals and finding a way to hang them in the window. I wanted to use all of the pretty pieces of glass, so nothing would be wasted. So… after putting my brain in creative mode, I decided to make a sort of window mobile / curtain of glass.

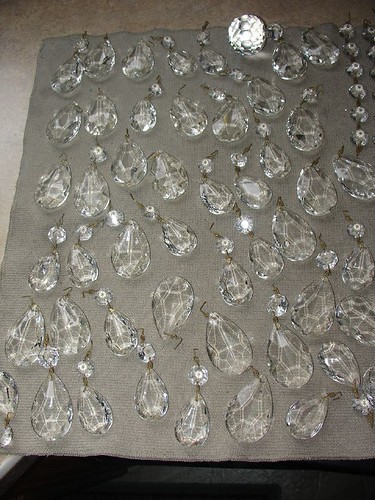
Step #1 – Remove all of the crystals

crystals

Crystals have been removed & are in a bucket waiting to be cleaned.

Step #2 – Clean
I put all of the pieces in a small cleaning bucket & soaked them in water/dish soap/ and a bit of alcohol. The alcohol helps to keep water spots from forming on the glass.

Step #3 – Lay out to dry
crystals drying

Step #4 – Hang curtain rod inside of window casing.
* Be sure that hanging crystals will not interfere with opening the window – or opening curtains.

curtain rod

Step #5 – String the Crystals
I didn’t want to see the string used to hang each strand of crystals, so I used clear nylon sewing thread (you could also use fishing line). Because I didn’t want to stand up on a ladder & string each crystal, I decided to lay the rod across 2 chairs & stabilize each end with a pair of heavy books. For my project, I wanted the height of each piece to be a bit random, but you may choose to make everything more even.

Step #6 – Hang the rod in the window
* VERY CAREFULLY 🙂

I am really enjoying my new display – even before I have my curtains up… that project will be for another day (soon I hope 🙂

Simple “Free” Decorating Solutions – Basket of Hydrangeas

Sometimes the best ideas for decorating our home comes from the natural world around us.

When you’re hard pressed for ideas on how to bring your home to life, perhaps taking a peek outside at the “living world” around you will give you just the decorating tip that you’re looking for 🙂

There’s something very comforting about walking into a home that has a “bit” of nature there to greet you. I like to call it “feathering my nest” 🙂 When you think about it, you are actually bringing life into your home when you bring in items from the outside.

So many times, people automatically reach for what they already know (such as a bouquet of flowers) and their creativity seems to stop there. The next time you’re looking for a new little touch around your home, try to look past the things that automatically come to your mind & look for the unexpected.

This cabinet needed a little something on top, but I wasn’t sure what to use. I already had a nice basket that I was using to display some of my magazines, so I decided to fill it up with some dried hydrangea stems. I really like the way it turned out.

Here are a few other articles that you might like as well.

Grapevines for the in the Sitting Area

Lots of Creative (cheap 😉 Fall Decorating Ideas!

How to Make Easy – Beautiful Curtains

Easy Curtains For Any Space!

Nearly 8 years ago, my husband & I decided to look for a bigger piece of land to move our family onto. We did a lot of praying & looking before we miraculously found our “perfect” piece. So… for several years, when I would find something that I loved at a great discount, I would pick it up & pack it away “for the new house.”

The piece of fabric that I made this set of curtains from is no exception. When I saw the bolt of fabric in the Walmart craft section, I knew I needed to buy some – especially at the $3 pr yard price!

When we were finally able to move into our new home, I had the perfect place to use that piece of fabric that I had secretly tucked away a few years ago.

There are 2 windows in the living room. Because the windows flank both sides of the love seat, I decided to make one panel per window. During the day I open them up to the outside of each window which makes them look like a “pair” from the other side of the room.

This type of window treatment is very easy to make! They remind me of a big pillowcase (except the opening is sewn shut 🙂 I like to line the curtains unless both sides of the fabric are pretty to look at. After all, you want the folks outside to see something pretty as they look at your house.

Here are the simple instructions.

– Cut each piece of fabric to length that you want
– Be sure that the pattern of the fabric is not upside down
– Put the right sides together (the side you want showing) so that the wrong side is facing out on the front & the back
– Pin down the sides for easy sewing
– Sew down both sides
– Sew across the top
– Sew across the bottom leaving an open space in the middle of the seem big enough to turn it right side out – Press flat
– Hang with sliding round hook clips

After looking everywhere for the cheapest hooks, I found JoAnn Fabric to be the cheapest. They have a 10 pack of iron ring hooks for $4.99! There are lots of different types of round hook clips, but the iron ones are my favorite. Not only do they look nice, but they seem to be much stronger as well.

I made another set like these for my bedroom with NO SEWING at all! I simply used tablecloths that I picked up as an end of season sale for a few dollars each. They were the perfect length for a luxurious puddle effect at the bottom.

You could also use a flat sheet, which would make it very easy to coordinate your curtains with your bedding.

You can make these types of curtains for any space. They are quick, easy, and most importantly – easy to open 🙂

Vintage Pine Cupboard Redo

Because I already feel SO blessed, when my husband asked me what I wanted for Christmas, it took me a while to come up with something.

Some of you may remember my post back in October about one of my favorite antique pine cupboards that I picked up years ago for $2? Well, when I told him I’d like to have my cupboard painted as my Christmas gift, he painted it right away!

I really love the deep red, because it compliments everything in our home. Many readers wanted to see the finished result, so I thought I’d post it for you all to enjoy!

What a wonderful husband I have – and as I told him… he is my gift 🙂

Here’s a picture of the cupboard before

antique country pine cupboard

* From Pearl

Thank you all for the kind words!

Just goes to show you – one person’s trash really is another person’s treasure!

I picked this piece up at a yard sale. When I asked to gal if she had anything else inside
for sale, she took me downstairs to show me a few things – however, nothing really caught my eye. But when I turned around to come back up the stairs, I spied this cabinet standing up behind the door. When I asked her if she wanted to sell that piece, she said – “oh that thing, I don’t think you could even get it off the wall, because it’s been sitting down here in the basement for so many years!” When I assured her that my husband could indeed remove the piece from her basement (I was thinking piece by piece if we had to :), she said – well, you could have it for $2. No thinking on my part – a quick “SOLD” came out of my mouth!

It has provided a lot of joy over the years, and now with it’s new coat of color, it is ready for many more ahead!

Ok – for those of you who might be saying… well, that was many years ago, those things don’t happen today! I want to tell you – the same thing happened just a couple of years ago to me! I picked up a VERY large vintage pine cabinet for $17 at a local estate auction. Everyone was pretty much finished with the “good stuff” inside when they moved out to the garage. Most of the gals wandered on home, but from my past experiences, I knew that great treasures lay waiting for me out there! Sure enough, when everything was pretty much said & done in the garage, everyone started home. I went up to the auctioneer & said, I’d like to bid on that old cupboard against the wall. He said… who will give me $50, who will give me $20? But no one was really paying attention. I said, I’ll give you $17! Once, twice, sold to the lady. Now… how to get this huge beauty home? Well, because it had tiny wheels on it, my friend Kelly & I simply pushed it down the street 🙂

The moral of the story?
#1 Keep your eyes open, because most people don’t look through the same eyes of vision the way that you will!
#2 Don’t buy a huge cabinet unless you have a friend to help you push it down the street 🙂

Great Christmas Find – $1.49

I wanted to post a picture of my newest find at the local thrift shop. These little Christmas trees have such a wonderful vintage look to them with their creamy color & hints of sparkle. I only paid $1.49 for both of them! While I was there, I saw HUGE piles of Christmas items to choose from.

Think about it… people everywhere are pulling out boxes & boxes of Christmas decorations from their attics. As they sort through it all, they decided that it might be time to finally get rid of some of it 🙂 So – they pass it on to the local thrift shops. This is your opportunity to pick up some very nice things at VERY nice prices!

If you enjoy vintage style decorations you will find some very nice finds, because many times, people want the “newest styles”. But, I did find a BRAND NEW Martha Stewart wreath made up of silver bells for $1.98 – so you can find new things as well.

Enjoy & be sure to come back & post your newest finds!