I love finding ways to turn everyday common items, which would otherwise go into the garbage, into beautiful items that everyone can enjoy!
So… when I came across a gal who was making beautiful beads from recycled newspaper, I had to share the idea with you!
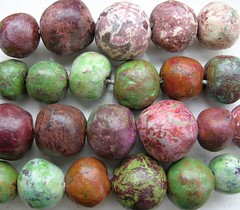
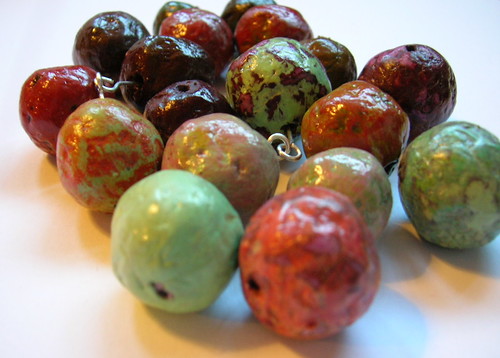
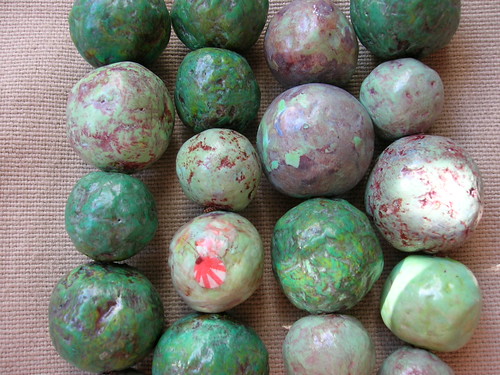
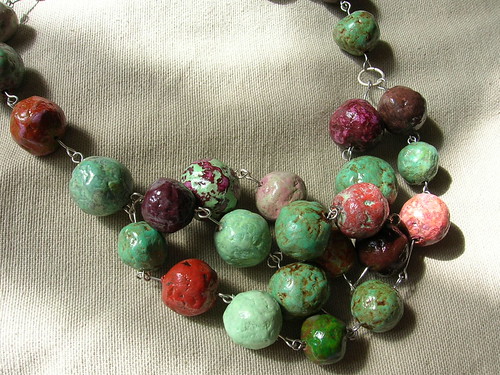
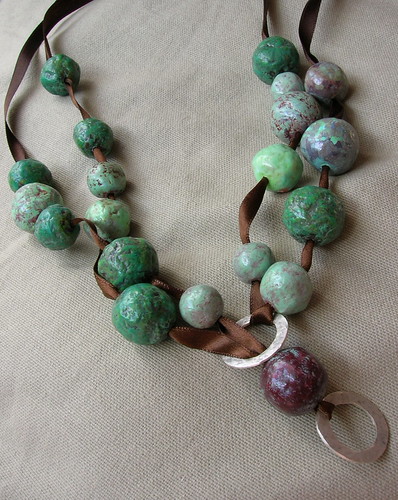
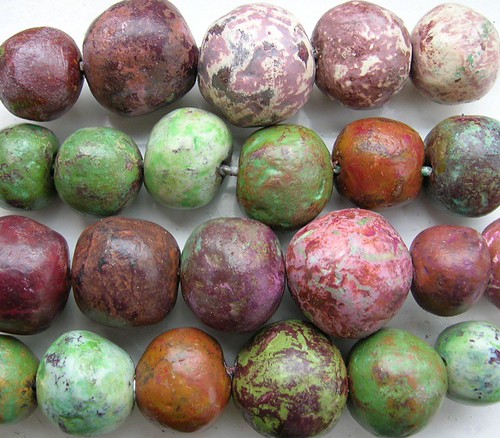
When I saw Helen’s beautiful beads, I asked her if she would mind sharing how she made them. After hearing from her, I realized that the methods used for these beads, were the exact same methods that I have used for several different projects including; costumes, handcrafted paper, and sculpted home decor items. I think what I love about her beads though… is the natural earthy look that they have. Please click on the pictures & visit Helen at her Flickr space!
What better way to pamper yourself than to make something so beautiful that costs nearly NOTHING! It would also be a great way to make some beautiful gifts for less than pennies – while recycling those pesky piles of old newspapers 🙂
Perhaps you could also earn some extra money by making a nice little business out of your beautiful new creations! I’m sorry… there I go again… always the business mind 😉
Step #1 – Gather a small pile of newspapers from the recycling basket.
Step #2 – Rip the paper into small pieces
Step #3 – Put the pieces of newspaper in a large stock pot
Step #4 – Pour enough boiling water over the paper to cover
Step #5 – Allow to sit for an hour or so
Step #6 – Stir the paper to help break it down a bit
Step #7 – Drain as much water out of the paper as you can
Step #8 – Add enough glue to the paper to help it hold together in a ball shape (any glue that is clear when dry – such as Elmer’s, or PVA)
Step #9 – Roll the paper into round balls being sure to squeeze out as much moisture as you can while rolling (you can make any size you would like)
Step #10 – Let them dry for a few days – rolling them every several hours – until they are completely dry
Here’s a mix of paper & felt beads. I love the look of this mix!

Step #11 – Sand each bead down with a bit of sandpaper to remove rough edges
Step #12 – Drill a hole in each bead that is big enough for the material that you want to string them with
Step #13 – Paint them with left over craft paint
Step #14 – Give them a coat of varnish
Think of all of the different variations that you could make with this technique! The colors & stringing material possibilities are endless! I think some pretty pink beads strung on black velvet ribbon will be my first pampering self indulgence 😉
And… don’t stop at just making beads!
How about…
– Little hearts for a Valentine’s Day banner, or to grace the front of your handcrafted cards
– Tiny beads to make earrings
– Little snowmen with a coat of cream paint – drenched in chunky glass glitter
– A nice chunky key chain made from beads & ribbon
– Snowballs strung on a ripped piece of homespun fabric – to make a snowball tree garland
Well, I think you will agree when I say that these little bits of recycled newspaper are some of the most beautiful bits I’ve ever seen!
This is a great project ….sounds like a perfect craft for these grey winter days. Thanks for passing it on 🙂
great project…ill try it.
Hey
I was wondering if you could use old magazines?
Hello Celeste,
You could certainly try!!
I think this would be a great art project when my neice has her group of girlfriends over for a sleepover weekend. Fun way to make ‘chunky’ jewelry. might be a great Mothers Day project for my 9-10 year old boys Homeschool group of friends too. Thanks for the reminder that this a fun way to recycle.
Jalet ~
I have the same plans for my daughter! She LOVES beads, and I thought this would be a great way for her to make up some great styles of her own – as well as for her friends!
And… a string of “chunky” beads used to be cheap in the stores – NOT SO anymore!
I can see… bright colors, pretty yarns, chunky colorful ribbons, and other little “add ons” to make some wonderful necklaces for the girls 😉
The colors are so natural looking…I think I will try small size egg shapes to go in a nest my son gave me. Won’t those look cute painted like Robin eggs?
Lisa – That’s a wonderful idea! You could make all sorts of beautiful eggs this way!
I like the ethnic look of these. A great project to share some quality time with my 11 year old daughter.
I love this idea! It looks easy and inexpensive enough. Hopefully I can give this a try sometime soon. Thank you so much for sharing.
~Gretchen
those are gorgeous! they do look like precious stones and no way like leftovers from newspapers we read 🙂
Very good idea.I will try.
Very beautiful blog
Could you make the beads larger like the size of a baseball? I think it would look beautiful on my coffee table. IS there any trick to making the colors look so natural?
Thanks,
Kyle (Suzanne)
Ma of 3 p’s in a pod
Kyle –
I’m sure you could make anything out of this product! I’ve used it for several different items. These would be great tucked inside a birds nest, in a wooden butter bowl, or something similar.
You could always make them hollow by putting paper mache around balloons as I’m not sure how well a big ball of wet glue and paper will dry, but I’ve done this before with balloons and it’s worked great.
yeah right> dis will be gonna my nicest project in our school!!!
I was also wondering how she made the paint look so cool. I love these. And the felt beads, what’s that all about? Too cool? Does she make those too?
Please share the painting method.
hi i would also like to know how much glue to add and also what paints were used many thanks helen
Hi,
We are producing handmade felt beads that is very usefull for arts and craft works. If you need any help, please reply me to info@ahcraft.com
Thanks,
Shyam
Oh I love this…how beautiful. And to think they are made from old newspaper. The mix of the beads with the felt is gorgeous. Thank you for sharing this clever use of recycled newspaper!
Great project – thanks for the instructions. I think I will try making different sized spheres (3, 4, 5 inches in diameter), decorating, and then display in a wooden or glass bowl.
Thanks for sharing such wonderful ideas! I really enjoyed your site. I have 5 grown daughters and we have a craft night once a month. I think the beads will be a fabulous project. So nice of you to share the directions. I will visit often. Thanks Again! Glamma Fabulous
Kelly – Sounds like you & your daughters are very close! I love to hear about these kinds of “family” times together! Please do share your creations with all of us!
Pearl
I love the beads made by Helen from recycled newspapers. The instructions said to paint them with acrylic paints. But, how do you achieve the multi-colored, natural, marbleized look? Thanks so much for your feedback.
Where can you buy these necklaces?
They’re lovely! I so want to go and make some right now, and guess what! I’ve got everything I need at home! I love doing crafty things and that looks so easy and fun. I so want to be making some recycled beads!
I shall be passing on the page to a friend who’s doing a jewellery making course at the moment. I’m sure she’ll be thrilled at being able to make endless beads for next to nothing.
Rose ~
Thanks for your kind words! I hope your friend enjoys the how-to!
Pearl
Hello,
can I suggest that you use a scewer or an even finer metal wire for making the holes while they dry. You might wait a while before you put them on the wire or scewer so the beads firm up, but poke a hole first,(with a toothpick?)one on each end so the holes look neat and tidy, and then put them on the steek. I’m not sure the medium would hold up so be careful and try it first.
I love the felt idea. How about dryer lint?
dana
the quality of your presentation and apparent care make this site a treasure.
the idea of using parenting or bonding with friends around recycling is what this society needs.
and there is no limit to creativity…
paperweights–chimes–mobiles–faux-ceramic dishes–bead curtains–wall bead chains–belts–shoe bobbles–enough?
Very clever–you’re right about all the possibilities there are with these!
This is so cool! I have done a similar project, but I use rose petals instead (when you wear them, the scent rubs off!). And instead of drilling a hole into the beads, I puncture them with a needle or a small taper before they dry.
Jessica ~
I wrote an article about rose petal beads several years ago… yes they are WONDERFUL… and so romantic!
Pearl
could you tell me about what you did with the rose petals. and I love the beads making, my granddaughter that is 6 loves beading, and we got right on it, she didnt want to leave to go home until she could see them. but we will work on the together tomorrow. thanks.
hi, this is such a great way to use old paper, really want to try it for myself but am just wondering what ind of drill do you use to make the holes and do I need a vice on a work bench to hold the bead while I drill it???
Holly ~
You don’t have to actually use a drill if you’d rather not. You can simply poke a hole through the bead with a toothpick while you’re forming the shape. Remember to twist the toothpick a bit as the dry, so they don’t stick to the beads.
The drill just makes the whole process much easier & the holes all the same size, etc.
Pearl
those are great .when i was a child we made simular beads in bible school out of torn christmas paper
If anyone is interested in a good cause and would like one of these necklaces, you should know about “Paper to Pearls”, a charitable initiative of Voices for Global Change. I first found out about this initiative through my college. See below:
“Our handsome paper bead necklaces are made by hand by women in the internal refugee camps of Northern Uganda. The income from the sale of the necklaces helps them buy food, medicine, and school supplies for their children. In addition, net revenue from the necklace sales is given back to the camps in the form of education, training and entrepreneurship development.”
http://www.papertopearls.org/
These are fantastic!
I love these beads and the project. A friend once used the same technique for breaking the papers down in boiling water etc. But then put the boiled and drained paper scraps into a food processor. After shredding, mixed with paste and then put the mixture over an overturned bowl. Leaving it out to dry for several days…you end up with the mixture pulling away from the bowl/mold and you have a bowl. You paint it, decorate it with pictures or cutouts…or just a painted design. And then varnish. You can’t eat out of it or put liquid in it…but use it decoratively.
I have used this technique for different things as well. One of my projects was… I took a ceramic angel (who was praying on her knees) & covered her with the same mixture used in the beads. After it dried, I simply pulled the outter layer of paper off of the angel… painted it with a patina technique… and had a beautiful piece of paper that looked like an aged stone statue!!! Cost… NOTHING! I used to place that piece on top of an antique clock… she peeked over the wooden carved trim & was so beautiful 😉
Pearl
This is a great tutorial. I love these beads, I just might have to find a way to incorporate them into a set of cards!
Thanks for writing about this!
Alex
p.s. The toile background on your site is very nice, I just designed/printed a letterpress stationery set for a client which included a wood box faced in toile wrapping paper.
Alex ~
Thank you for the compliments! I was pretty proud of that background… especially since it was my FIRST attempt at creating something all by myself! And… toile in any form or shape just has to be loved 😉
Pearl
This is an awesome way to recycle! I tried it and made some beads, but I can’t quite get the colors to marble like you did. Any tips?
Courtney ~
You could paint the beads any way you’d like. To get the marble look… you would paint the beads one color… then use a different color after the first color is dry. Make sure to allow some of the first color to peek through the top coat.
Pearl
This is amazing!
These look great! I will definitely try these next weekend! 🙂
the beads are gorgeous – i can’t wait to try this! thank you for sharing!
These look great! Thanks for this article.
How did you paint them to get that crackle look? I love that.
I love the natural ethnic look of these beads. I can see my daugther and I have great fun making these next weekend.
Are the felt beads made with the same technique?
Sono collane bellissime, colori molto gradevoli e di buon gusto.
Brava! Carmela
* From an Italian reader… here’s what she says:
They are the beautifulst necklaces, colors many gradevoli and of good taste. Good! Carmela
Thank you very much for the translation. That was quite interesting.
Hi,
I’m Helen (the maker of the beads in the photographs!) Thank you for all your lovely comments.
To get the mottled effect I paint lots of layers of different coloured paint on the beads and then sandpaper them down again to reveal the layers underneath.
Hope you’re all having fun making them!
Helen
Hi,
I’m fascinated with this project. What type of paint did you use on the beads once they dried?
Thanks!
Raegan
How do you make the colors of the beads look like that?
Lisa
can i make it out of colored paper instead? i dont have paint but i do have lots of colored paper. any ideas or suggestions are welcomed!
The Beauty of this method is… you could use just about any paper that you have around the house!
Pearl
I bet you could! And get lovely colors, too.
How long do the necklaces typically last? Would moisture, sweating be an issue?
I’m going to do this with my daughter. It will be fun…or an adventure! 😉
i second above comment! i would love to know how well they hold up through time and wear. and what kind of ‘varnish’ would you recomend?
Great idea, I’ll have to try this. What type of varnish do you use?
Just wanted to say these beads are gorgeous and thanks for sharing them. I have two questions, though. Firstly, when I tried this project myself i had some difficulties because the newspaper would make little clumps, making the beads somewhat fragile. Do you have any suggestions as to how to avoid this? Secondly, I myself would like to know what varnish you use!
Thanks
came across your great tutorial. I would like to write up a mention about it on my blog (It’s a blog about beading)
Please let me know if that would be okay. You can go check out my blog to see what it’s like at http://thebeadkitchen.blogspot.com/
Thank you for such a cool tutorial. – Ginger
I am amazed at these beads. Brilliant idea!!
Oh, my gosh! I am so excited to find this and to try it! What fun!!
vry nice n creative.. i like it
This is a great project, looks wonderful!
What type of varnish do you use? Please let me know as I would like to try this project soon, thanks
Can someone please tell me how to get the beads to form. We made a few beads but are having trouble with the paper staying together. We have added a ton of glue and still nothing.
I’ve just been using regular varnish (the kind you’d buy in a hardware store and use on wood!). I use a few coats.
With regards to the paper holding together to form the beads, I have had a couple that fall apart too, expecially when I come to drill the hole. It seems to happen to me when the paper hasn’t broken down into tiny enough pieces and sort of clumps together. I try to get a really smooth papier mache mixture with the paper completely broken down so it’s almost like a paste. (I’ve been putting the mixture in a blender to do this!).
I’ve also found that if I try to squeeze too much of the water out when I’m rolling them up then they’ll fall apart too.
Not sure exactly how durable they are yet! I started making them about a year ago and the first one’s I made are still looking good. The main drawback is that they’re not waterproof but apart from that they seem to be pretty durable.
I haven’t tried the beads yet but I use this same process to make bowls. I make large paper bowls. I found not only does old newspaper work well but also egg cartons. I can’t recycle them so I put them to use this way. I too use the process of blending. Be careful how much paper and water you put in the blender so that you don’t burn out the blenders motor. The paper is heavy so I only fill the blender to half full. If you blend paper this way you can also make bowls without the glue if you want to. As for durability I have painted the bowls and they will hold water. I still won’t recommend putting food in them that way. I would think that the paint and varnish should make the beads sturdier as in the bowls. This is a wonderful tutorial and all the other comments are great. Thanks.
u guys are so creative!
any ideas to decorate notice board?
i really appreciate some help here…
Your beads looks like precious stones, very unique.
I love this process and have started making lots of beads.
Mine are still a bit rough but I like the look.
So far have just used some for a bracelet which I threaded on elastic cord. I put a glass bead between each paper bead.
Tips I found good, roll balls when some water in mixture, hold together better.
Don’t use too much glue.
To paint them, thread onto a chopstick, tell where I live?
I even partly dried some in the microwave and they were fine.
Thanks so much for these ideas, aloha Lilla
There aren’t words for how much I love this. I guess it helps that I abhor junk mail and enough of mine is on newsprint that I will definintely be upcycling it like this!
Thank you so much for this tutorial!!!
GREAT tutorial!
My trick for getting the paper torn up small enough is to use an old blender (hello thrift store!). Tear up the paper and add a little water to make a slurry. At least this is how I did it when I was making regular paper and my grand scheme for making these beads.
My sense it that you wouldn’t need heat doing it this way. At least that is what I will find out the hard way 🙂
I read that you definitely want to use separate stuff just for paper and not use the bowl/pot/blender for food, too.
HTH!
I’ve seen paper beads made by rolling strips of paper and then coating with glue. but I have never seen it done this way. They look great.
at what point do you add the glue? so you do it while you’re rolling the paper or do you mix it in?
wow …nice handiwork!
I love working with papier mache. It’s been a while since I’ve done it and your beads have inspired me to start back up. Thanks for the tutorial.
This is really cool/. We run a recycling site (printer cartridges and cell phones) that I’ll post this on. Thanks for sharing such a neat idea. Our recyclers will love it!!!
http://www.ecyclegroup.com
The kids and I started this today… I didn’t read all the comments first, so I don’t think we got the paper shredded enough. Anyway, our first batch is sitting in the open window drying… we will see how they turn out! I am very exciting, though I am sure it will take a few batches for them to work well. What about adding a varnish or sealer prior to forming the balls to help make them water resistant? The kids were funny… whining about getting sticky during the process!
esta carta es muy buena..meravillosa, un espectaculo de colores..
Editor’s Note: English version – This letter is very good .. meravillosa, a spectacle of color
Cool concept, with a great result. Thanks for sharing.
This is a wonderful idea. I love all of the pictures. I have gotten into making paper beads again, it is such a great way to use scraps of paper and to recycle. I will definitely try this!
connected with paper!i love it!i’m happy to share the same interest and love for my recent hobby-papier mache.your beads are simply delicious!and combinnig colors with textures is everything!….the pictures quality is also at level!i love the felted beads!
question-what kind of wire do you use.are they stainless?
Thanks for this post, which I recently found. I have linked to it on my blog.
Great idea… like someone else wrote, I too should have read the comments first… I think the paper pieces I used are too big.. we will see. Anyhoo, I was wondering, isn’t there a varnish or something that we can put on the beads to make them waterproof?
Those are great, I’m so glad I found this article! I’ve been experimenting with papermaking with recycled paper, and I can see these as a great extension of that.
By the way, if you have an old “stick” (or immersion) blender you don’t mind sacrificing to the cause, it’s a great tool for turning wet paper scraps into paper pulp, without waiting the hour or using boiling water. Very hot tap water and 20 minutes will do the trick if you use the blender.
I think they’re way beautiful. Thank you for sharing this information with us.
This is a great idea. Ive done similar work..You can also use old nail polishes for update colors to match up with clothing.
I got into paper bead making this summer (I’m a teacher who has summers free) and just fell in love with this craft. However, my beads are all rolled. I am so happy that you have shared these earthy round beads with us and I can’t wait to try making some. Thank you so much for passing this craft on to us all!
Hallo
I studied environmental education at tertiary and been looking for practical ways of turning waste into invaluable gifts for people. Obviously making money from it. I am looking forward to learning and transferring this skill to those who would appreciate it.
Your website is truly a treasure-filled chest.
Thanx a million x over.
Treasure Tau
My school gave me a task on letting my 6 yr. old make jewelry out of recycled materials. I thought of the beaded necklace using newspaper and it was fun and we enjoyed it! And we mixed it with some artistic jewelry i shopped online and it turned out so perfect and colorful! Great article,
Thanks for having this craft online. I just started working with the elderly at our local nursing home and I can’t wait to try this.
hi
i was just wandering what to do in my spare time (which is pretty much at this moment) and i found this lovely website.
i’ve started doing the beads – i torn the newsparer with which my dog helped me and then i put the boiling water 🙂 so now i am waiting – hope i’ll manage to make cute beads….
Thanx and best wishes Dessy
This is great! I just love to make some of these on my free day. I just love the colors and the style are absolutely unique! I bookmarked this page and so I can have this as a guide in making my own beads. Thanks for posting this and sharing it to us. God Bless.
I LOVE YOUR BLOG!
I will be QUOTING YOUR BLOG AT SOME POINT TODAY USING KWOTE
but in the mean time I wanted to give you an award for making me SMILE!
GO HERE to see the AWARD BUTTON
http://flbyu.blogspot.com/2008/11/award-for-me-maybe-for-you-too.html
right click the AWARD and save to your desktop
I am “giving” each of you the I LOVE YOUR BLOG AWARD
then just follow the directions
After receiving the award we must:
1)Add the logo of your award to your blog.
2)Add a link to the person who awarded it to you.
3)Nominate at least 7 other blogs.
4)Add links to those blogs on your blog.
5)Leave a message for your nominees on their blogs.
Sweet site.
I’m doing this for x-mas.I think my family will love it.
I cant wait to see there reaction.
They all ways get jewlery but this would be something differnt.
Its so COOL!
This x-mas is going to be so fun my family will love your idea.
I know that this is a great idea to make for x-mas.
I would love to learn more.
Keep on keeping on.
Good night!
I cant wait to try this idea.I’m doing it this thanksgiving.
My cosin all ready saw the idea and cant wait to get hers.
I cant wait to see how they turn out.
keep on keeping on!
its amazing idea!
I am just wandering how do you drill the beeds? what kind of tool I should use to make a hole in the beeds.
Thanks a lot
This is such an awesome idea! I might use it as a business-from-home idea, as everyone in my school is crazy about the environment, and I might share it with the local Earth club, it would be a great group activity.
I love chunky colorful beads, and the ones you posted look fantastic!! I can’t wait to make mine!
Thanks for posting! God bless.
Hello,
I have added a link to this article on my blog today!
http://greenearthjourney.blogspot.com/
Sincerely,
Hyla
hay.
what a sweet website.
this gave me an idea for x-mas.
keep on keeing on.
Hi I was just wondering if a flour and water mixture would work instead of the glue? It could really add to the whole “earthy” theme
Hello!
I just have to say, awesome blog! This is such a fascinating idea, I’m dying to try it!
I was just wondering, do you know of any surface in particular that I should use to dry the beads?
I was thinking about a cookie sheet for baking, or some aluminum foil.
Also, my friend was thinking about starting a little business on the side with recycled items, and I told her about this. Any tips?
Thank you so much!
God bless, Liz.
i love these beads. was looking up recycle newspaper and found site my daughter is doing recycle project at school we are at the drying stage cant wait till there done so exciting and so beautiful hope ours turns out so pretty thank u
Thank you so much for this wonderful wee blog! I am always on the look out for involving, fun, and cheap (we don’t really have much of a budget!) crafts to do with the young people I work with.
This is just perfect. Thank you for taking the time! 🙂
Hey… maybe you should try puttin’ toothpicks (not used- lol)in the middle while they’re drying to save you time later instead of drilling holes. I tried and it works… Later dudes
omg… thank you so much for sharing this amazing tutorial…!! im going to try it right now:]
Now thats what i call Art!! i would have never thought of that personally. i have seen all sort of beads here in kenya, but nothing like this. I guess there will be much bigger and greater gifts this valentines. Am a fun of recycling and since kenya doesnt have a paper recycling system, i guess i will try this out with the youth in church. great work!!!
Wow, I love the organic look to these. As a beader and a recycler you really caught my attention! I’ll be writing about this and linking to you on my Art of Recycling blog. I’ll do it again on my Beading Blog after I get a chance to make some of my own.
Thank you so much for passing along this information. Those beads are beautiful! And now I can’t wait to get started making them.
OMG these beads are amazing! i am in the middle of making some right now. but i have a couple of questions…
how should i let them dry. won’t they get a flat side?
if i use a toothpick while drying to make the hole, how will i be able to re-roll it every few hours, (will they turn into oval/long beads)?
i was looking at your beads on flickr, and some of them are wrapped in cotton string. how did u do that? did u paint them, put the varnish on, and while the varnish was still wet, did u wrap the string around… then put more varnish on top?????
i am going on a missions trip to guatemala this summer with brio magazine… and i need to raise around 3000 dollars. i was wondering how much i could sell necklaces and bracelets… and maybe even earrings(ive quilled earrings before) for? obviously it is for a good cause, and it would make a great profit, since they cost virtually nothing!
i just wanted to tell u that these beads are AMAZING! great job! hopefully after a couple of tries i will be able to make good beads like u!
thanx so much for the great idea!
Layla( o and for the record, im 13yrs old)
ok so i made my first batch of beads… and they looked AMAZING!(if i do say so myself)
a couple of tips i found helpful…
dont sqeeze all of the water out while rolling them.
if a bead falls apart while u r rolling it, or or re-rolling it after a few hours of drying… go to the sink and drip a few droplets of water one it and re-roll… theyll be good as new!
use glue sparingly.
i used my big brothers drill he uses for model airplanes to drill holes.
use an oven mitt to hold the bead while drilling it(im a wuss who thinks shell drill her finder off! LOL)
if teh bead falls apart while ur drilling it, super glue it back together!!!! (i admit, i did in fact do this with 2/36 beads!)
when painting, paint on wooden skewers.
i used modge podge or whatever its called for my varnish(oo, shiny)
varnish on wooden skewers too!
use plastic paint for ur bottom layer of paint… otherwise u will end up sandpapering off the bottom layer, showing how grey the beads are!
i hope i helped with ur beads!!! im making another batch today =D
Anyone tried this with magazine paper? I think I love this, Im going to try it this week. Also.. If you dont have a dremil (sp?) tool, couldnt you use toothpicks while its wet? Just a thought… Because I havent bought on yet. 🙂
I made a ton of these and LOVE It. It was so much fun…I hope you don’t mind but I posted pictures of a couple of the bracelets I made and will giving you credit (with a link).
Thanks for sharing!
Jessica
** Editors Note
Here’s Jessica’s blog link: http://jessicastrinkets.blogspot.com/2009/03/paper-beads.html
Where she made the beads & posted some pictures (although she didn’t post the link back yet 😉
Wow,
Imagine my surprise…I have been making beaded jewelry for a short time, and recently came upon a business venture with my employers. They asked me to make jewelry out of recycled stuff (we are a recycle business)which they would buy from me. These beads are perfect and beautiful. Thank you for sharing and don’t ever be sorry for your business mind. I believe with your help and if we help each other as human beings, there will be a brighter future for my children and I as well as many other people.
Thanks again,
Lynn
I would love to see your beads. I can not get enough at looking at these fascinating beads. They are so beautiful.
I have tried making these, it is not easy but quite rewarding. I made my own glue using cornstarch and it work quite well. I find it easy also, to just drill it after it has dried so you can keep the round shape. It is also helpful to re shape the beads and mold them into round shape as it is drying so it does not lose its shape. I just saw something like this featured on etsy that’s made into magnets and shaped like hearts, pretty cute.
I am very happy to know how to make beads because it had helped me to make a necklace for my mother as a gift on my mother’s day.
WOW what a great Idea, I am studying fashion and we have to do a whole essay on RECYCLING. I think I will get top marks
– Thanks
Were the FELT beads made using the same method?
I have a question…
is there a way to control the color that the beads turn out being?
I’m working on a necklace but I want to have the colors stand for things.
This is really great. I can’t wait to try. 😀
haha umm.. so ignore my last comment.
somehow i definitly didn’t see it say to paint the beads. lol
great work. love the blog.
I tried to make these and failed miserably ,i didnt let them dry but a day and the papers were not torn into small pieces and also the beads were very very very fuzzy.Your beads are so beautiful and shine,and i am wondering how much u would sell them if u had a business.bye for now
I started making those beads some months ago, but how do you paint them so nicely?!
thanks for that information.
now i don’t need to ask my mom to go to the supermarket to buy beads beacause now i know how to some the easy way!
thaks a lot!
I saw this blog a few months ago, and the beautiful beads stuck in my mind. I tried it a while ago and also took your suggestion of starting a little business! Check out my Etsy shop at http://www.EverydayDiamonds.etsy.com!
Thanks so much!
Ohh! it´s so beautifull!!!
I dont speack english… i so sorry.
I love work with papers, stons and colours.
If you want you can visit my blog:
collardepapel.blogspot.com
Would love to see a painting tutorial for these beautiful beads.
This was a rainy day project and we finished it on a cold day (the weather has been less than co-operative for July). The turned out so nice. We’re going to buy a nice bowl and display them in my 4.5 year old’s bedroom.
I would love to know the technique you used to paint these pretty beads. Please share.
thanks so much for posting this! it is a great craft idea and the beads look awesome! i can’t wait to try it out!
I love the look of these beads!
Thank you so much!
I’am going to mix up a small batch tonight to see how they do for me!
I;m loving this idea and have got some drying out but please would you beable to share with me the technique of how you painted these bead, There absolutley stunning.
great idea… will definitely try this one.. could i have a few more ideas on paper mache like masks or something 🙂
Thank-you for sharing! I’ll tear up my paper tonight and let it soak in water all night.
Sure glad I read all the instructions well, and the comments; so I don’t have to ask you one of those repetitive questions. lol!
how do you drill the hole?after they get dry or before?and with what?
Thank you for sharing a wonderful idea. i hope you could still share other tips how to make beads from recyle or help us spend less for making beads and accessories. keep up the good work.
Hello Pearl, I can not get enough of your paper mache beads. Got any more pictures????
This is incredible. We do a class for home schooling moms on using the web to find ideas to keep your children engaged in the learning process. This site is definitely on our “Goto” list.
I love this – it’s look and especially, that it’s sustainable! I’m building my own jewelry website and will try this idea out to add to my designs. Thanks for this 🙂 J
I’m in the process of making my own recycled paper mache beads now, but am using old egg cartons instead of newspaper. I absolutely love the beads Helen has made and hope mine turn out as well. You definitely cannot beat the cost of the beads nor the fact that each bead will be its own unique creation! Thanks for the pointers and excellent photos!
wow…im plannin to do this for my project,,,just one thing..are they hard? or a bit soft bcoz they were just made out of paper? are the colors from the paper itself or you have to paint them? please comment back asap tnx 🙂
ahw..i guess i was not able to read every comment..i got the answers already thank you…but one more thing… what kind of paint did you use?
tnx:)
Isn’t this GREAT! Oh, I have so many beads in mind that I want to make with my son (and alone as well) now! Thank you! I subscribed, so I’m eagerly awaiting some more great ideas. 🙂
i love beading it isthe the best thing in the world from shara
Hi. My name is Maryam. I am the founder of Womenfound. We are a tsteful boutique retail store that benefits women. I would love to carry some of the beaded pieces made by readers. Our proceeds are donated to charities and foundations that help women around the world.
I also have some unused loft-space where I’d like to start workshops for kids and adults to create the beads and make earing, necklaces and bracelets.
Please let me know if anyone is interested in creating pieces for sale and/or helping spearhead the classes.
Thanks and best,
Maryam Zar
Womenfound.com – together we can do much good…
How long did this process take to make enough beads for a necklace? Is it hard to drill the beads to make the holes? Thanks, these look awesome!
DO YOU HAVE ANY MORE CREATIVE ACTIVTIES
So here I am trying to make these. Silly question I am sure…but after pouring glue all over a pan full of drained and still damp newspaper, trying to make that into balls and having no success, now I am taking little bunches, pouring glue onto those and trying to roll them into balls – UMMMMM – GIANT mess all over the place. What am I doing wrong? Or is this supposed to be really messy.
I don’t know if my previous question went through. One of them I found out myself. But I would like to know at what point you put glue in them? Do you put it in the whole mass of paper and then roll it out? That seems to be a LOT of glue. Or do you use glue for each individual bead you roll?
thanks! came across this lovely little article while searching google, myself and my best friend laura are going to make these and turn them in to braclets and necklaces to sell at the markets for some extra pocket money! 🙂
these beads would look great with hemp necklace.s
Prettier beads than any I’ve seen for weeks of looking at the car boot sales. I’ve trawled through hundreds of pots of old beaded necklaces and can’t find any I like.
I think it’s time to make my own!
Thanks for the inspiration!
WOW! I’m trying this today. My question is how is she able to make the beads so earthy looking? Is there a special method to achieving this look?:)
greatest idea i have ever heard!!! i alway spend so much on jewelry!! if i want to make beads necklace with recycled newspaper, looks like the picture here: http://www.jewelryvogue.com/store/necklaces/unique-generous-poly-necklace
how to make it bright?? any info would be appreciated.
those look awsome
I just LOVE these earthy crafts. Reuse, repurpose, reduce, recycle, love it! Yesterday’s news, tomorrow’s necklace!
I’m not sure if my comment posted.
I LOVE these beads. They’re very cool. I make paper beads from rolling up paper but this is a whole different approach. Very nice!
What a great, inexpensive idea–making beads out of newspaper. I have been experimenting with making my own beads, expecially faux turquoise (since turquoise is the rage right now in fashion). I used wood beads with paint–wood is light-weight and unbreakable. I will try making some out of the newspapers, and make it looke like peices of turqouise stone. Thanks for sharing the idea.
Love this idea for my Junior Girl Scouts! I am looking for instructions on how to weave baskets, kleenex box covers, platters, etc out of twisted newspaper.. I found and took pictures of some of these for sale in Mackinac City, MI… and just thought it was a great craft for us to do… however, I have not found ANYTHING on-line for twisted weaving… can anyone forward me any ideas or a site to get free instructions?? Thanks!!!!
all i can say is “Wow!”. Thanks for this informational article.=)
this is very creative and cool that you had the time to make this and still have fun will your donig it.If you didnt make it on your own creation than tell me where i can find the website.Thank you for your time.
P.S good job on telling me how to make it.
Love these! I linked to it in an article I just published here.
this is really stunning! Thanks!
I HAVE ATTEMPTED TO MAKE THESE, AND ROLLED THEM SO SMOOTH AFTER A DAY OF DRYING AND THEN PUT THEM IN THE MICROWAVE TO SPEED UP THE PROCESS OF DRYING AND IT WORKED GREAT.
THEY DO NOT LOOK LIKE YOURS AND I TRIED TO SAND THEM BUT THEY ARE TOO HARD TO SAND
I NEED HELP WITH THAT
AND ALSO HOW DO YOU GET THE DIFFERENT COLORS? I PAINTED THEM ALL A DARK BURGUNDY COLOR AND NEED TO ADD SOME PIZZAZZ TO THEM
I DID READ ALL THE COMMENTS AND COULD DID NOT SEE THESE ANSWERS
OMG!! These are wonderful! I have started making my own beads but these are soooooo coooool! I can’t wait to try them out~ Thank you so much for sharing
Gorgeous!
Can someone please tell me how to get this marbelled look on the beads??
Hi Ammy
To get the marble paint look: first you use diffrent colored papers when they are dry and sanded use a none colored glossy varnish, paint the bead with tissue paper with bits of paint here and there then let dry and sand again, then add another coat of glossy varnish. You have to be a little creator thou. It worked with me fine better than the one in the picture.
sorry for my english
Wow, very nice beads. I think i’ll try to make them myself.
Thanks so much for sharing this idea! I am in the midst of starting a small home based business and I think this will incorporate well with my theme! I plan to test some bead like items with scents such as cranberry for Christmas decor. I have a clear vision of them strung as garland as they bring the smell of the season into my home! Maybe dip them in scented candle wax for fire starters in the fireplace! I’m also in a Church group that feed the needy and this may work as a great fund raiser! I especially like the “felt” beads, these may look great with a denim type look catering to the young at heart. My mind is racing with endless ideas… I will let everone know how these turn out as soon as I succeed :)also feel free to try my ideas and share your results with the rest of us… Again, thank you for sharing.
Hi I am just getting into all of this as a way to fund my non profit dementia ministry … were you able to scent the balls and wax them as fire starters? Thanks
LOVE THIS im making some right now to make Grape decor for a wine taste party.
thanks
and thank to the person with the blender tip. makes it a lot faster.
WOW, these beads are beautiful and one of a kind, what a great idea. Thank you for sharing. Best Wishes, Lynda 🙂
Step #8 – Add enough glue to the paper to help it hold together in a ball shape (any glue that is clear when dry – such as Elmer’s, or PVA) I think that’s how much glue you add
Can’t wait to try this!! Love the marbled look of the paint. Was wondering if I could roll them in the second color to produce that effect, or maybe sponge on the second color?
Now I will have to un-train my husband when it comes to putting the newspaper in the recycling bin! LOL
Wow !!!! Awesome. I will try.
I think this is a really nice idea. I plan to try it as well as try the same process to make a bookcover. Thanks for the inspiration. 🙂
Your sis in Christ,
Suz
Just put some newspaper in a bowl to soak 😀
Great idea, I love the paint effect on your beads, they look marbled!
I have made paper beads from old magazine with bright colorful pages. I will surely try making these now since my sister will have plenty of old newspapers to donate for the project. However, what is the BEST vanish to use for beads? I ask since people will wear these against their skin, worried about reactions and sweat. After all, I would not my Bead Gifts give anyone a rash or stick to their skin!
I love your ideas…..They have saved my butt many times 🙂
Thank you Aayan 🙂
Your beads are great! I help write art lessons for a small, nonprofit art museum. Would you consider letting me use one of your photos of paper beads to illustrate a lesson on using paper in new ways? Louise
Thanks for spending the time to discuss this topic that I feel so strongly about. I love being able to read more on the topic
Hello webmaster I like your post ….
Great articles & Nice a site….
I absolutely like your blog and find nearly all of your post’s to be precisely what I’m looking for. Again, awesome site!
Fantastic post I ve been looking for a tutorial like this for days. Thank ou both for sharing.
I also would like to know what varnish you recommend for the beads. These are beautiful. Thanks so much for sharing.
I would like to know what type of varnish are we talking about (name brand, where to find)? How do you do the felt?
I’m so inspired! I can’t wait to give this a go. Giant thanks for sharing…
I love beads and i wil like to know how to make some
oh GOSH, what a treasure for my eyes … wonder wonder wonderful
Your beads are absolutely beautiful! How do they hold up with constant or daily use?
love the beads….. i made a bunch of them myself!
How do you paint the marbled coloring effect on the beads?
I have an article on my blog on how to make homemade paper, but I don’t let the paper sit and soak. It gets shredded then whirled in a blender. I like these colorful beads! Does she use the funny papers or ads to get the multi-colors?
I learned to make these when I was in the 5th grade and other items from newspaper in the 60’s. These are great looking
Eu já havia visto esses trabalhos e nunca poderia imaginar q eram feitas de papel jornal, muito bonito ,vou tentar fazer tbm, jornal eu tenho bastante.
great info. will try this
Hi there, what a brilliant idea 🙂 , i like so much this idea..Tq 4 sharing.
I really like these beads. I would like to teach some of the kids in my class how to make these. I am a missionary in Honduras and teaching kids crafts to sell locally and elsewhere.
When you say to paint them with leftover craft paint… what is that? Can I use any kind of paint?
Hope I heard back from you soon! Thanks!!
Marillyn,
When I say craft paint, I mean the small bottles of acrylic paints we typically use in crafting, but you could use pretty much any paint you have available.
These are beautiful!
Hello, I check your blog on a regular basis.
Your story-telling style is awesome, keep doing what you’re doing!
The beads are stunning, I love them! will be making some soon. Thank you Karen for sharing this cool idea.
Dear Pearl,
I like to show you how things worked out! We sell the chains for charity (Soroptimist International) in our region in The Netherlands. Hope the photo’s come through!
Thank you very much for sharing this wonderful idea with us!
Ditty Smit van Damme.
/Users/smit/Desktop/IMG_4088.JPG/Users/smit/Desktop/IMG_4084.JPG
This is such a great idea! I would do it to make Christmas tree garlands. I am going to share this link at my forum as well.
There are so very nice projects in this book. Easy, inexpensive and cute. Not only would young girls like to work on these, but I volunteer at a nursing home and I think the ladies there would enjoy doing these too. They would be so proud of what they had accomplished by themselves. Thank you for these great ideas
I was wondering if you use ads in the mail that are like news print and if the color would not fade
out so the beads would be colored. Also, I was wondering , if you could form the beads around tooth picks and leave them to dry on the tooth picks. Maybe you could hold beads on the tooth picks to paint them and coat them with a clear coating.
Patty, I try not to use shiny paper in the mix. Forming the beads around toothpicks would work fine! You would just need to be aware of the shape. I might be harder to have round beads when forming around something. Have fun creating!
Dear Pearl,
I asked you a few times how you make the “marmer” effect on the beads, but sent it to a wrong address, I fear.
Please will you let me know how to get two or more different colours on the beads?
We made already many beads and sell them for charity via our Soroptimistclub!
Thank you so much! Ditty Smit, The Netherlands.
Bonjour,
il y a trop de commentaires à lire mais est ce que quelqu’un s’est posé la question de la toxicité d’un vernis ?
Bonjour, Non, je pense que personne ne l’a fait. Vous devrez vérifier les produits dans votre région pour trouver un produit avec lequel vous vous sentez à l’aise. J’espère que vous pourrez y trouver quelque chose.
Merci beaucoup!