Recently I received this email request from a dear friend. I wanted to share my response with you – especially since the holidays are coming up & this would be a nice gift to give – for very little cost!
Hi Pearl,
I was wondering if you had or know of a place where I can get some directions on how to make a Penny rug runner. I thought this would be an interesting project to make. I just don’t have a clue how they are made.
I love the look of the wool and the colors for fall. I’ve found places to buy them but I would like to try to make one.
Hope you had a great vacation.
Lois
Dear Lois,
Good to hear from you! Yes, we had a wonderful time visiting with family over the last few weeks. We spent our time participating in a youth conference at my parents church, resting, visiting, and a quick trip to Baltimore. We especially loved the aquarium! I’ll have to post some pictures here real soon.
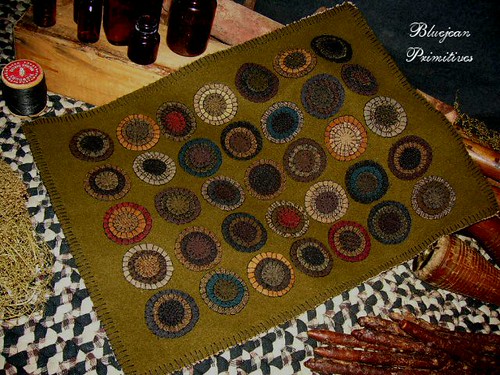
I hope the information below will help answer most of your questions. I just love penny rugs, especially when they are made out of all of the vintage prime colors! I especially love to see them used during the Autumn season with all of the rich golds, browns, and reds!
What is a penny rug?

As we all know, women are by nature extremely creative & very resourceful.
Ok…well, most women 😉
But back in the 1800’s most women had to make the best of the resources that they had, especially when it came to things such a splurging on decorations for the home. So, they would keep the small bits and pieces of the wool and felt that they collected from their clothing, hats, coats, blankets, etc., and then use these precious bits of fabric to make beautiful decorations for their homes.
When they had a nice basket full of little snippets of fabric to work with, they would sort them into piles of similar colors. Then, to form the desirable circular shapes, they would use a coin as the template to cut their fabric pieces from. Using something as small as a coin would insure that the smallest of scraps could be used in the project. This is how the term penny rug came to describe these little pieces of art.
What’s also interesting is, the penny rug was not normally used as a rug at all, but rather, as a decorative cover for a bed, shelf, wall hanging, or table runner.
 Robin’s Rug
After cutting all of the different circle shapes, each color was put into it’s proper pile, where it would wait for it’s turn to become a part of the finished design.
The finished size was determined, then a piece of fabric (wool or felt) was chosen as the base for the rug. Each circle was then placed on top of the base in the desired pattern, so the creator could decide what the final design would look like. Once satisfied with the design, each piece was then secured with a straight pin so it could be stitched together.
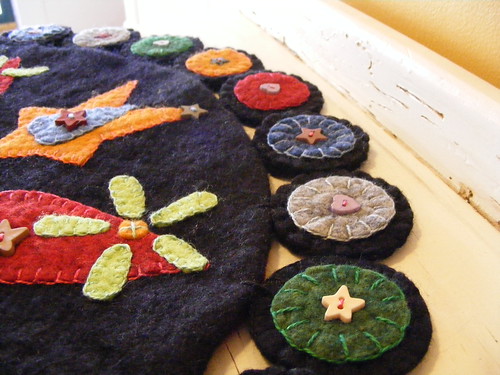
Although any style of embroidery stitch could be used, the one most commonly used to applique the individual pieces of fabric in the penny rug was the blanket stitch. Bright colors of thread, that were different from the piece of fabric being stitched, helped the pattern to stand out even more, and also added another creative layer to the piece. Depending on how intricate the creator wanted to be, the circles might also be stacked in several layers, each smaller and a different color than the one below it. Sometimes the rugs were backed with a piece of an old burlap bag or feed sack, and on special pieces, an actual penny was stitched under one of the circles to help weight it down.
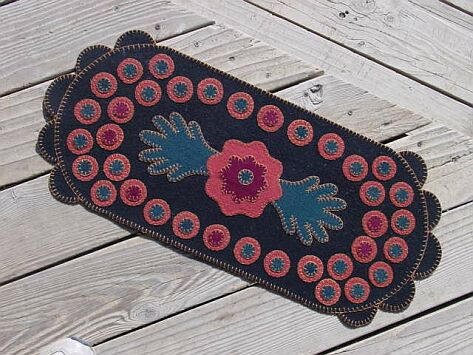
Although circles were the main shape used in early designs, any shape imaginable could be used in current designs. I have seen some beautiful pieces made with shapes such as; stars, hearts, snowman, crow, and trees. There’s really no limit to the designs that you could come up with, you simply want to be sure that the pattern can easily be hand stitched around each edge.
Materials to use in making your penny rug
Most penny rugs were made using wool, and felted wool. Although felt was handcrafted in years gone by, we are blessed to be able to buy felt by the square (usually a 12X12 square) or by the yard in most craft/fabric stores. Last year, I picked up some wonderful thick felt yardage, which came in colors such as dark mustard, chocolate, deep red, and cream. Check the prices, but I found that buying my felt by the yard was much cheaper than buying it by the square.
If you’re an adventurous soul, you could try your hand at felting your own wool!
Have you ever thrown a wool sweater into the washer/dryer without realizing it? Then, when you took it out, wondered who the tiny cute little sweater belonged to – only to realize that it used to be a human sized version of YOUR new sweater? Then you already have all the experience you need in felting wool 😉
Simply go to your local thrift store, yard sale, or your own closet, and pick out a cheap wool sweater (I suggest 100% wool) of your color choice. Keep your eyes open for sweaters with small holes or other damage, as these will turn out to be real bargains for you. First, cut down the side seems, separating the front from the back. Then, remove the arm sections, and cut down the long seem. Throw these pieces into the washer, and wash on the hot cycle with a bit of laundry soap. If you’d like, you could also throw the pieces into the dryer as well. You can expect the pieces to shrink up to 70% in size! When the material is dry, you can cut it into the desired shapes for your penny rug.

Embroidery floss makes the best choice for sewing the pieces together, and you can buy nice large bundles of different colors at your local craft/fabric store.
How to Construct a Penny Rug
Free Penny Rug Patterns
Here are some free penny rug patterns, as well as a few how to articles to help you with ideas… but the best patterns come from your own creative ideas – just like the gals in the 1800’s 😉
Christmas Tree Penny Rug
Roosters & Flowers Penny Rug Pattern – The Instructions
Circle Table Runner Penny Rug
Warm Hearts Penny Rug
Autumn Leaves Pattern
Penny Rug Coaster Pattern