How To Eat An Artichoke

Artichoke? What’s that?

Seriously though, it wasn’t until the last few years that I had ever really eaten an artichoke. My family was from the south, and we usually stuck with your everyday “normal types” of veggies, so believe me when I tell you, that I wouldn’t have been able to tell you what an artichoke was if you had asked me!

Skip ahead to the last few years…

I LOVE ARTICHOKES!

My husband & I have raised our family smack dab in the middle of Italian country, and let me tell you, they love their artichokes! But even with my new found love of this veggie from heaven, I still have never been brave enough to buy them from the store & cook them myself… until now!

If you’re anything like me, you love the great artichoke recipes that you have out in your favorite restaurant, but haven’t braved the “cook your own at home” scenario yet 🙂

So… I’ve decided to share a few GREAT resources that I have recently come across, that I think will help you uncover the mystery of cooking artichokes at home. Even though there are several different ways to prepare artichokes, they are delicious any way you slice them!

How to Eat an Artichoke Video:

artichokes-trimmed

Click Here for a great step by step how to article, including detailed pictures

Easy Apple Pie Rolls

Easy Apple Pie
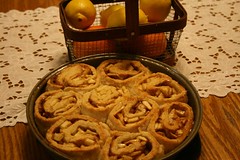
I just love the smell of apple pie baking in the kitchen! But the one thing I like better than smelling it is eating it!

I like to think of the recipe as a mix between apple pie & biscuits. The cook book calls the dessert “Roly Poly Pudding”, although I might call it something more like “Easy Apple Pie Rolls” (I know – not nearly as exciting as Roly Poly Pudding 🙂

The recipe is basically a biscuit recipe (which might be familiar to you, if you already make biscuits in your kitchen), and a group of other ingredients that would be used in making an apple pie.

Biscuit Dough:
2 cups all-purpose flour, sifted
3 teaspoons baking powder
1 teaspoon salt
1/4 cup shortening
2/3 cup milk

Filling:
1/4 cup softened butter
3 cups cored, peeled, and finely chopped apples
1/4 cup brown sugar, firmly packed
1/2 teaspoon ground cinnamon
1/2 cup granulated sugar
1 cup water
2 tablespoons fresh lemon juice

First lets make the biscuit part of the recipe.

Mix all of the dry ingredients together, then “cut in” shortening with a pastry blender

To cut in = using pastry blender, large fork, or clean fingers 😉 to combine shortening with dry ingredients. You know you’ve properly “cut in”, when the mixture breaks apart into small bits that resemble a lumpy cake mix before you mix it 😉

Add the milk a little at a time while mixing gently. The batter does not have to be smooth, and is ready to work with as soon as it can be picked up & rolled out.

Then, on a surface dusted with flour, roll the dough out into a large rectangle (approx. 8X12). Spread 1 tablespoon of the softened butter over the dough.

Spread the apples over the dough, leaving about an inch on all sides. Then, mix the brown sugar and cinnamon together and sprinkle over apples.

Why don’t you go ahead & turn your oven up to 400 right now, that way it will be heated enough to put the rolls in when you’re ready.

Mix the granulated sugar, water, lemon juice, and 2 tablespoons of the butter together in a pot & cook until dissolved. Pour this mixture into a shallow baking dish.

Starting with the longest end, carefully start rolling up the pastry. When you’re done, you should have what looks like a 12 inch long tube – not a VERY fat stumpy 8 inch log 🙂 Slice the roll into 1 inch pieces, and place them in the baking dish with the sugar mixture – apple side up. Spread the remaining butter on top of the rolls, and then bake them for 30-35 minutes.

These would be great served with some heavy whipping cream or a spoon of vanilla ice cream!

Have a Marvelous day!
Pearl

Several New How-to Articles Today!

Cherry Cottage Red Mosaic
Recent “Best of Home & Garden” Award Winners!

Cherry Cottage Red Mosaic

I wanted to share several new articles that I’ve added to the article bank today. I hope many of you are able to use the information in these new how-to resources. If you would like to share an article, tip, or resource with our readers, please feel free to send me a post below!


Your Own Family Homestead For Pennies on the Dollar

Ideas For Your Own Home Business

Back to School for Less

Head Lice – How to get rid of head lice quick, easy, and cheap!

Lavender – Fragrant Luscious Lavender for Your Garden

Brand New Site Almost Done!

Hello everyone!

Our new site is almost complete! After years of having a website online, I felt is was finally time to do some spring cleaning – and organizing 🙂

As you can see, I haven’t been able to post here for several days, because I’ve been really working on re-building my website.

After lots of programing, everything is nearly done! I’ve been writing online for many years now, but I haven’t had a good way to share all of my articles – while keeping things organized for my readers.

I’ve finally completed the new article database & I will be spending the next few weeks adding all of my past articles to that section. Here are just a few of the ones that I’ve already added:

Learn to Raise Magnificent Monarch Butterflies
Cake Recipes – Scrumptious Easy Layer Cake
Make your own pita bread!
A New Way to Save Using Rain Checks!
How to Safely Transplant Your Garden Plants

Check back often – as I will be adding new articles on a regular basis!

Pictured:
I’ve always loved the colors pink & green together. Here, I’ve mixed a piece of pottery ($5 at TJ Max), a small iron bunny ($4), a Waverly mustard & red toile tables runner ($6 TJ MAX) and my gathering basket.

A Sweet Surprise! ~ A unique little treat for those you love!

Don’t you love getting those great little fortune cookies when you eat at Chinese restaurants? Well here’s a few great ideas to put an element of surprise in your life!

Fortune cookie recipe:
1/2 C flour
1/2 C sugar
2 egg whites
a bit of almond extract & vanilla extract

Beat egg whites until light, slowly add sugar – then flour.

Add extracts – Batter will resemble a runny pancake mix.

Pour onto heated pan cook watching closely – turn.

As soon as you take cookie from pan, lay message strip in the middle & carefully bend in half, then pull ends together in the fortune cookie shape.

Here are some ideas for how you can use your batch of fortune cookies:

* Put them in kids lunch boxes – tell them you love them, or write secret messages.
* Put them into hubbies lunch – you’ll know what to say 😉
* Use them as party favors
* Send them as invitations
* Door prizes
* Scriptures for church dinners, or Sunday school class
* It’s a boy or girl – give birth information
* Do home parties? Use them for coupons!
* Teachers gifts – let the kids tell them how much they like their class 😉
* Boy scouts, girl scouts
* Tea & garden parties – personalize them to your group

Have Fun!

How to Give Your Room a Designer Touch Using Old Chandelier Crystals!

A few years ago I was given an old (but not vintage) brass colored chandelier. The gal who gave it to me said she simply hated the piece & couldn’t wait to replace it with a more modern style of light fixture. Of course, when she offered it to me, I gladly said yes, because I knew that I could think of someway to use it.

Fast forward a few years after the chandelier has been waiting in my basement for just the right project… A few days before Christmas, I came up with the idea of removing the crystals and finding a way to hang them in the window. I wanted to use all of the pretty pieces of glass, so nothing would be wasted. So… after putting my brain in creative mode, I decided to make a sort of window mobile / curtain of glass.

Step #1 – Remove all of the crystals

crystals

Crystals have been removed & are in a bucket waiting to be cleaned.

Step #2 – Clean
I put all of the pieces in a small cleaning bucket & soaked them in water/dish soap/ and a bit of alcohol. The alcohol helps to keep water spots from forming on the glass.

Step #3 – Lay out to dry
crystals drying

Step #4 – Hang curtain rod inside of window casing.
* Be sure that hanging crystals will not interfere with opening the window – or opening curtains.

curtain rod

Step #5 – String the Crystals
I didn’t want to see the string used to hang each strand of crystals, so I used clear nylon sewing thread (you could also use fishing line). Because I didn’t want to stand up on a ladder & string each crystal, I decided to lay the rod across 2 chairs & stabilize each end with a pair of heavy books. For my project, I wanted the height of each piece to be a bit random, but you may choose to make everything more even.

Step #6 – Hang the rod in the window
* VERY CAREFULLY 🙂

I am really enjoying my new display – even before I have my curtains up… that project will be for another day (soon I hope 🙂