Pink Roses That You Can Make

Pink & red roses are in high demand this time of year, and as well they should be! After all, we are honoring the most important women in our lives – our moms!

Pink roses that you can make

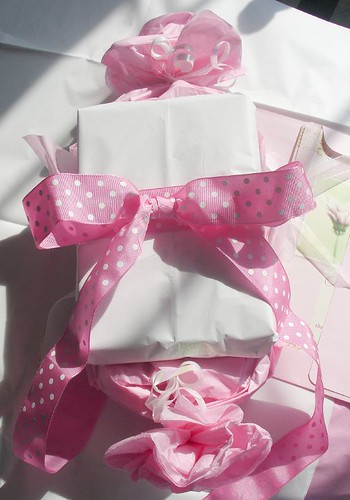
With Mother’s Day being just around the corner, I thought I would remind you of a very simple way to decorate those pretty packages!

Pink tissue paper roses!

They are so easy – very inexpensive – and so beautiful!

I remember making this kind of rose when I was a child, except they were as big as a dinner plate! I loved them then, but for some reason, I haven’t thought about them again until today.

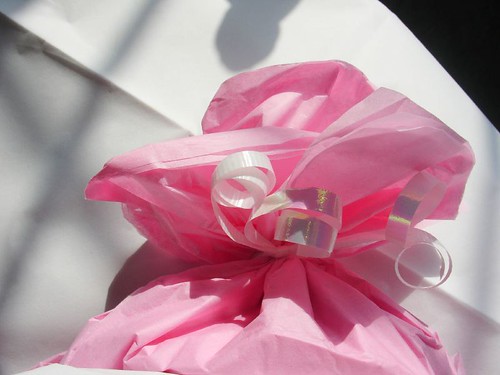
This morning I was wrapping my mom’s Mother’s Day gift so I could put it in the mail, when I remembered the paper roses I used to make as a child.

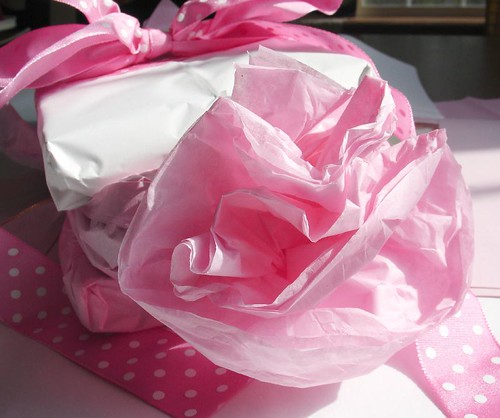
I decided to wrap part of the package like you would a piece of candy – with twists at each end. But instead of folding the ends & taping them as I usually do, I decided to make them into pink roses instead.

Here’s how to make the roses when you are wrapping a gift.

Wrap your gift using 2-3 sheets of tissue paper (I kind of roll the gift so there are several layers of paper at each end – this makes a nice full rose). Tightly tie a ribbon around each end. Be sure to leave several inches on each end, so that when you gather it tight, you will have enough paper left to “pull” into a rose. Then, gently pull each layer of the paper apart, and shape into your rose.

Here’s what mine looks like from the top.

Pink paper roses

You can also make paper roses without wrapping a gift first.

– Decide how big you want your roses to be, then add a few inches extra for gathering
– Cut 2-3 strips of tissue paper that length
– Roll the paper into a loose roll (you can wrap it tight to begin with to make the center of the bud if you wish)
– Gather at one end & secure with a piece of wire, or a twist tie
– Pull the layers of the paper apart to make your desired rose shape

Think about all the beautiful colors & patterns that tissue paper comes in these days! You could add a few different colors (or patterns) together for a great effect! And tissue paper is so inexpensive, that you could make a room full for a few dollars! You say your a shabby chic, country cottage, or Victorian kind of girl? Hey – why not use these little beauties to decorate your space!

Oh – the possibilities!

Pink package with pink roses

Who Says You Can’t Play With Your Food!

Kids inside with nothing to do? Why not make up a quick batch of play dough? You probably already have the ingredients on hand. It’s easy, contains no harmful ingredients, and if they decide to lick their fingers while they play, well, you don’t have to worry about that one 🙂

2C dry milk
2C creamy peanut butter
3Tbs honey

Mix together to make a play dough consistency. Add dry milk as needed. It might be good to bring out this recipe right before lunchtime. The smell of this dough is bound to make them hungry enough to eat their lunch like good little artists 🙂

Pictured: Here is a whimsical snowman from my collection. We’ve gotten so much snow over the past few days (approx. 18 inches), that I thought I’d share some snow with you today 🙂

How to Give Your Room a Designer Touch Using Old Chandelier Crystals!

A few years ago I was given an old (but not vintage) brass colored chandelier. The gal who gave it to me said she simply hated the piece & couldn’t wait to replace it with a more modern style of light fixture. Of course, when she offered it to me, I gladly said yes, because I knew that I could think of someway to use it.

Fast forward a few years after the chandelier has been waiting in my basement for just the right project… A few days before Christmas, I came up with the idea of removing the crystals and finding a way to hang them in the window. I wanted to use all of the pretty pieces of glass, so nothing would be wasted. So… after putting my brain in creative mode, I decided to make a sort of window mobile / curtain of glass.

Step #1 – Remove all of the crystals

crystals

Crystals have been removed & are in a bucket waiting to be cleaned.

Step #2 – Clean
I put all of the pieces in a small cleaning bucket & soaked them in water/dish soap/ and a bit of alcohol. The alcohol helps to keep water spots from forming on the glass.

Step #3 – Lay out to dry
crystals drying

Step #4 – Hang curtain rod inside of window casing.
* Be sure that hanging crystals will not interfere with opening the window – or opening curtains.

curtain rod

Step #5 – String the Crystals
I didn’t want to see the string used to hang each strand of crystals, so I used clear nylon sewing thread (you could also use fishing line). Because I didn’t want to stand up on a ladder & string each crystal, I decided to lay the rod across 2 chairs & stabilize each end with a pair of heavy books. For my project, I wanted the height of each piece to be a bit random, but you may choose to make everything more even.

Step #6 – Hang the rod in the window
* VERY CAREFULLY 🙂

I am really enjoying my new display – even before I have my curtains up… that project will be for another day (soon I hope 🙂

Don’t Just Bag Them & Toss Them Out – Use Your Old Clothing to Make Enough Money For a Whole New Wardrobe ;)

I am so in the mood to clear out closets, bag everything up that we don’t need & find a way to rid our home of the extra clutter! I’ve come to expect this feeling around this same time each year, but this year I feel particularly motivated 😉

In the case of your clothes closet, I’m sure that you have piles of clothes that don’t fit you anymore – maybe the kids have outgrown some – or maybe you’re not into those retro styles that you’ve been storing in your closet since the 70’s for… who knows what 😉

This year, instead of trashing them, or simply bagging them up & stuffing them into the goodwill dumpster, why not use this idea to earn back some of that hard earned cash to use on new clothing that you might need!

Sell your clothes through consignment shops!

Consignment shops will take your clothes, put a high enough price on them so you can each make a nice profit. Using this method you both win! The shops get more stock to sell, and you get the stuff out of your house & make some money to boot!

Here’s how to get started.

Call all of the consignment shops in your area & find out who has the best options for you to sell your clothes.

– Wash the clothes
– Mend anything needing a touch up.
– Put them on hangers
– Take them to the shop
– Wait for them to call you & tell you how much you’ve earned 😉

You wouldn’t believe it, but I also know of folks who do this as a way to earn a good extra income!

They go to all the rummage type sales that they can find, buy the best of the clothes, tidy them up, & take them into the consignment shops around town.

We have a few nice places in my area that have occasional .50 cent bag sales! For .50 cents, you get everything that you can stuff into a large trash bag! You wouldn’t believe the great things that I’ve gotten at those sales! My favorite finds have been – beautiful Victorian lace up shoes, and an Italian silk suit for my husband! Anyway, use those great deals to get as many nice pieces that you can, then resell them through the shops.

Finding the best name brand clothes will bring you the most money. Also, if you deal with vintage clothing shops, you could get some nice bucks out of those old retro things taking up space in your closet 😉

…………………………………………………..

* Pictured is a little corner of my home – wood trimmed rusty tin star that we received as a Christmas gift, a little red & black crackled foot stool that I picked up at a local shop, and another one of my Pottery Barn glass jar + candle combos (got both very cheap, but I think they make such a nice little addition to any room 🙂

…………………………………………………..

While driving in Pennsylvania, a family caught up to an Amish carriage. The owner of the carriage obviously had a sense of humor, because attached to the back of the carriage was a hand printed sign… “Energy efficient vehicle: It Runs on oats and grass. Caution: Do not step in exhaust.”
…………………………………………………..

How to Make Easy – Beautiful Curtains

Easy Curtains For Any Space!

Nearly 8 years ago, my husband & I decided to look for a bigger piece of land to move our family onto. We did a lot of praying & looking before we miraculously found our “perfect” piece. So… for several years, when I would find something that I loved at a great discount, I would pick it up & pack it away “for the new house.”

The piece of fabric that I made this set of curtains from is no exception. When I saw the bolt of fabric in the Walmart craft section, I knew I needed to buy some – especially at the $3 pr yard price!

When we were finally able to move into our new home, I had the perfect place to use that piece of fabric that I had secretly tucked away a few years ago.

There are 2 windows in the living room. Because the windows flank both sides of the love seat, I decided to make one panel per window. During the day I open them up to the outside of each window which makes them look like a “pair” from the other side of the room.

This type of window treatment is very easy to make! They remind me of a big pillowcase (except the opening is sewn shut 🙂 I like to line the curtains unless both sides of the fabric are pretty to look at. After all, you want the folks outside to see something pretty as they look at your house.

Here are the simple instructions.

– Cut each piece of fabric to length that you want
– Be sure that the pattern of the fabric is not upside down
– Put the right sides together (the side you want showing) so that the wrong side is facing out on the front & the back
– Pin down the sides for easy sewing
– Sew down both sides
– Sew across the top
– Sew across the bottom leaving an open space in the middle of the seem big enough to turn it right side out – Press flat
– Hang with sliding round hook clips

After looking everywhere for the cheapest hooks, I found JoAnn Fabric to be the cheapest. They have a 10 pack of iron ring hooks for $4.99! There are lots of different types of round hook clips, but the iron ones are my favorite. Not only do they look nice, but they seem to be much stronger as well.

I made another set like these for my bedroom with NO SEWING at all! I simply used tablecloths that I picked up as an end of season sale for a few dollars each. They were the perfect length for a luxurious puddle effect at the bottom.

You could also use a flat sheet, which would make it very easy to coordinate your curtains with your bedding.

You can make these types of curtains for any space. They are quick, easy, and most importantly – easy to open 🙂

Make Your Own Christmas Ornaments & Gift Tags

Each year I save my favorite Christmas cards & re-purpose them into different things. Here is a card that I turned into a Christmas ornament. I just added a bow that came from a different gift that year.

……….
Last year I kept all of my Christmas cards! They come with such beautiful colors & pictures, that I knew I’d think of something to do with them!

This year, I decided to cut out all the pictures & use them as this year’s gift tags!

Cut out whatever shapes you’d like, punch a hole in the corner, & tie on with ribbon. You could also tape them right on the package if you’d like.

Because you’re cutting out the picture from the front of the card, the back is normally white & not written on.

Use a pretty color gel pen & write your message on the back.
……….

Christmas card display
Hang varying lengths of beautiful ribbon from your curtain rod. As you get a Christmas card, pin it on one of the ribbons with a straight pin. Hopefully, you have lots of friends & can fill the whole window with cards! =) The end product looks like a holiday window treatment.

* You could also use last year’s cards for an instant display.